Flaky Pastry


A few seasons ago, there were a few dresses on Alexandre Vaultier's Haute Couture catwalk that I felt lent themselves to this fabric. And so with this post...which admittedly is a tad bit long (but filled with pictures)...I show you just a few of the many things you can do with this marvelous material. Think pastry.....with light and flaky layers that curl, that puff up and float effortlessly!!!
But first let's start with something really easy. How about an evening wrap that looks as though it floated down from the heavens.


1. Create a tube by cutting a length of fabric and fold it in half. Stitch along the top.
2. Turn right side out and press so this seam is now runs down the middle. Using the center seam as a guide, make a running stitch down the middle.
3. Gather by pulling the lower thread on one side, then on the other.
4. Adjust so that the gathers are fairly even.
5. You can take a small strip of fabric or a narrow ribbon and sew it along the gathers. This will help to stabilize the gathers and it provides a way to close the shawl.
6. Dolly can wear it as is, but I wanted the poufs to overlap, so with tiny, random stitches, I tack the poufs together in a few spots.

From front to back, Olympia shows you the final result. Super simple! Super dramatic!

But you came looking for French pastry so let's indulge in a buttery yellow delight. Shakira's "millefeuille" marigold dress is easier that it looks. It's a great project for a rainy day that with its many layers requires a bit of patience. This dress is completely made by hand. Take your time. It's worth the work!

In my last post, I showed an alternative method to finishing the edges of polyester fabric with a flame. For this exercise, the flame sometimes curled the edges which adds to the look. Don't worry about trying to be perfect. Don't beat yourself over any "mistakes." The more "organic" it looks, the better!
We begin by making a foundation garment or a sheath dress (though you can make any basic garment you want). Chose a color close to the color of your organza and choose thread that matches perfectly as well. Cut 1 to 1 1/4" (22-30cm) strips of organza on the diagonal. Don't measure. Estimate. The strips will be somewhat irregular which is what you want. One by one, bit by bit, holding each strip with two hands, quickly zip the edge past the bottom of the flame to seal the edges.

1. To start, I begin at the bottom of the dress.
2. The first strip begins and ends at the center back.
3. Another, somewhat longer strip is wrapped around the dress a few times, keeping each layer close together.
4. Here is how this looks at the back. At this point, you should hand stitch everything (using a back stitch).

6. Now this is when things get interesting. This time, instead of wrapping to the back, I loop it and pin back over to the other side.
7. Then loop back over and pinned in place back to the other side.
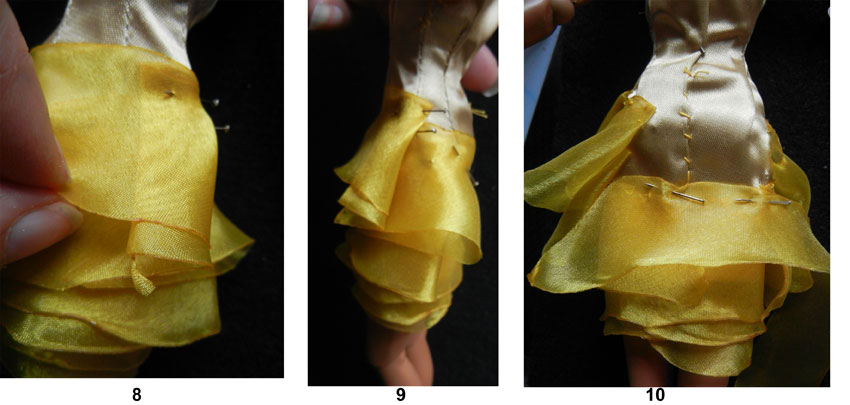
9. This is what my skirt looks like on one side.
10. Turn the dress to the back. Take another small strip and pin down, side seam to side seam.

12. End with a single layer. When clipping the strips, cut at an angle, and run a lit match quickly past the edge. If your strips aren't long enough. Don't worry. You can simply cut another piece and keep going. The whole point is to create the look of flaky, uneven layers! Note how I have stopped just shy of the waist.

14. I pin a second layer.
15. And a third.
16. Now because the inspiration for this dress has a curve in the layers, I curve each strip to one side and over the waist to the opposite side.

18. If you see any space, you can always cut a tiny bit of the strip, fold in half and slide into the spot and stitch down.
19. Go to the side of the dress still exposed. Fold the other layers over so you can work better.
20. Begin to add more layers. Her I added a wide strip which covers this part of the dress and pushes the other layers to the front.

22. Turn the dress to the back. I don't know what the back of the original dress looks like so I made the decision to keep things simple. I added strips which cover a complete side.
23. Same thing for the opposite side. When I stitch this down, I stop at the waist because I want to layers to curl upwards.
24. The back is closed with hooks and eyes. One tip: before you get too far with the back, stop to make sure the doll can get out of the dress. Make any adjustments before you finish adding the strips.


I wanted to incorporate that same idea into a design for a jacket.

1. I sewed a strip that begins and ends at the center back after wrapping around the front and neck.
2. I sewed a second layer and then a third in the same direction.
3. Afterwards, there is a small space under the bust near the arm. I looped a tiny strip and stitched everything down.

I didn't do anything at the back because I like the idea of the seeing the doll's back through the jacket. On the other hand, I took a bit of the fabric and wrapped it a couple times around the hem of the sleeve as a cuff.
If this is going too far over your head, we can do something much more simple!


1. Lay the doll down with her arms outstretched. Draw a T shape around her
2. This is your pattern. Top part of the T cut on the fold of the fabric. Cut a slit on the top and a vertical opening down the front.
3. Sear the edges and you're ready to go.

5. Cut up a few scraps. This can be random. Or you can plan shapes if you like. For this exercise, I've simply cut a few squares and seared the edges.
6. Pick each scrap up and form into a ball.

7. Pin onto the robe.
8. Continue until you are happy. I decided to keep the interest on the shoulders, so I stopped here.


And here we are. Nadia shows off this spectacular look from front to back.

If you fell in love with the simple kimono, you can simply use the pattern for an understated look. We can also decide to stich down the arms and sides without cutting away the rest of the fabric. Here, Liu wears a short version of our kimono, this time cut from a glitter organza.
The pattern is the same as the red kimono, but shorter.

You can even get more simple!


No matter how you turn her, she looks fabulous. The best thing....it's one of those looks that is super easy, not expensive and can be done in minutes!
 |
| A rose by any name. |
All images and text property of Fashion Doll Stylist. 2016. Please do not reproduce without prior permission. Thank you.
Follow us on Twitter: @FashDollStylist
Like us on Facebook: www.facebook.com/FashDollStylist
We're also on Pinterest: www.pinterest.com/FashDollStylist
Come show us your stuff on Instagram: www.instagram.com/fashiondollstylist


Nhận xét
Đăng nhận xét