Trash Couture


The technique consists of taking old T-shirts, cutting away the sleeves and neckband, then slicing cut-outs, slats or fringe. Of course, our dolls do not have "old T-shirts" laying around, so we have to make some first. But you only need to sew the sides and shoulders together and the end result doesn't have to be perfect. There are no fancy fabrics involved. No complicated sewing or finishing. Nothing is perfect. It's all in the name of fun! After all, this is "trash couture." The dolls wear it. The dude dolls whistle. Then after summer is over, they throw them away and start all over next year. (Not really, but that's the general idea.)
Basic T-shirt
In a very early post, I did a "Mattel" dolly T-shirt which is traced from an original garment and open down the back. But for these projects, you'll need a "regular T-shirt" that slips over the doll's head. The pattern is simple. In the two weeks it took to prepare this project, I experimented with different types of knits to see what was possible. Cut up old T-shirts work. You can always dye them (1/2 teaspoon of fabric dye to 1/2 cup of boiling water). Or embellish them with foiling, transfer or stickers.

2. Depending on the length you want, drop a vertical line straight down from the underarm point. Here I've extended 1" (25mm) Simply flip the sloper and trace onto the opposite side of the CF line.
3. Add seam allowance. For these projects, you only need to add seam allowance to the shoulders and sides.
4. Repeat for the back, using the back sloper.
5. Again, I added 1" down from the CB point and I dropped a perpendicular line down from the bottom of the armhole.
6. Add seam allowance as shown.
7. Hint: For the T-shirt with the fringe down the back, you can line up the side seams of the front to those of the back and draw a one-piece T-shirt. The only seam allowance you'll need is for the shoulders.

T-shirt with Back Fringe

1-2. I use the one piece T-shirt pattern and put it on the doll and check for fit and length.
3. Remove from doll, fold T-shirt in half and pin together down the side seam.
4. Cut into strips. I found you cannot cut thinner than 3/8" (6mm) without the fabric coming apart. You might want to test a swatch first.
5. Put the T-shirt back on the doll and carefully stretch each strip.
6. As you stretch each strip, roll the fabric in your fingers.
7. Grab two strands on either side and tie them into a knot. I've pulled the T-shirt to fit snugly onto the doll's body.
8. Two by two, continue all the way down the back.
9. My front looks like this.
10. Cut the neckline you want. You can also recut around the arms.

T-shirt Cover-Up with Fringe

1. Again, start with the one piece T-shirt pattern. I tried a different type of knit, something that doesn't fray, for this one.
2. On the wrong side, I mark off my fringe to ensure everything will be evenly cut.
3. Stitch together the shoulder seams and only down the back to the point where the fringe will begin.
4. Cut you fringe.
5. Here, Bea is wearing this over bikini bottoms.


I found tiny silver filigree "tubes" with 2mm holes. Roll the ends tight and feed through the bead. If this is difficult, use a needle and thread to help you pull the end of the fabric through the bead. Knot to keep the bead in place.

One Shouldered Top with Side Fringe
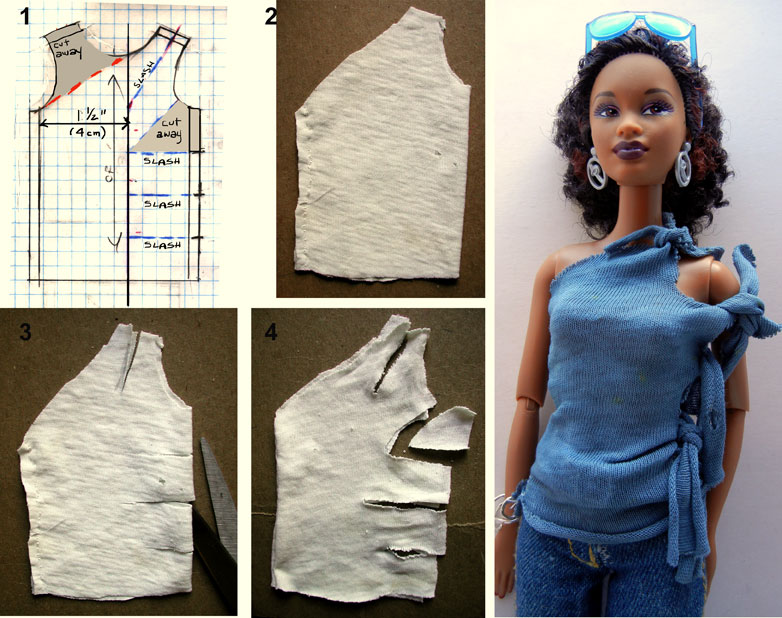
Another very simple look, this one starts with a basic T-shirt.
1. Cut away one shoulder. On the opposite side, divide into four parts, the length of the T-shirt from the underarm to the hem. Slash the T-shirt as indicated to within 1-1/2" (4 cm) of the opposite side seam.
2. Here is my basic T-shirt with one seam sewn and the shoulder removed.
3. Here is the T-shirt with the initial cuts.
4. There is a wedge cut away from the first slash.
5. And that's all...Place on the doll and tie down the side. Notice how one section is tied over the shoulder.
Draped Back T

One more (easy look). I wanted to translate "Trash Couture" into something less savage. Here is a simple top with a twisted back. You don't need a 2-way stretch fabric, but you will want to use something that drapes well.

This look is very simple in the front and quite dramatic in the back. I used a 2-way stretch rayon for this look. Here, Waris wears the top over a pencil skirt.

The classic T-shirt is drafted as shown at the top of this post. Add seam allowance.
Extend the back by 1-1/2 inches (4 cm) from the CB. Trace to the opposite side so the back pattern is all in one piece. Once cut from fabric. line up the front to the back at one shoulder and side seam. Twist the back twice so that the side seam and shoulder of the back lines up with that of the front.

Now for something a bit more complex but nevertheless easy. There are two knotting methods involved for most T-shirt cutting designs. I've tried to explain this as clearly as possible by using a diagram.

Weave
This technique creates a latticework with soft loops down each side. In essence you are simply pulling the lower slat up and over then looping the next one through.
1. After you have cut your T-shirt into slats, stretch them carefully. Take the second slat (red) and pull it up above the first one (black).
2. Fold this second slat (red) down past the third one (blue).
3. Pull the third slat (blue) up through the red.
4. Then pull it down past the fourth (purple).
5. Pull the fourth (purple) up and over and down past the next...etc until you reach the end. Once you have reached the end you can either stitch it down to the garment, or you can cut the loop and tie into a knot.
Hint: if you want a look that really hugs the body, make a dress with the basic knit sloper.
 |
| Super sexy, Joan wears a her lemon yellow dress over a fuchsia bathing suit. |
Weave & Loop

This is the same technique except that each loop is given a single twist before threading the next slat through. It forms a soft braid down center. Here too, we start with a 2-way stretch knit cut into slats.
1. Pull the second (red) slat up and over the first (black).
2. Make a single twist and thread the third slat (blue) through the second.
3. Make a single twist.
4. Thread the fourth slat ((white) through the third (blue).
5. Make a single twist and pull the next slat through, etc. As you work, a soft braid forms down the center. Again, either clip the last loop and tie into a tiny knot, or stitch it down to the garment.
Hint: Experiment with your slashing. Slash on a curve. Make double rows of slashes. Or after you have used one technique, you can come back and use a second technique on the same "weave." There are plenty examples on YouTube and Pinterest.
My research also led me to the intriguing work of Adam Saaks, a Los Angeles designer known for his super sexy slash and weave swimwear and jumpsuits.

Basic 1-piece Bathing (or Body) Suit
What is nice is that the same techniques can be used for 1-piece bathing suits. A while back I did a tutorial on a strapless bathing suit. But you'll really need a suit that fits like a second skin. So I decided to make a new tutorial.These are really nice to make because they can also be used as a form fitted top worn with evening skirts or with pants Warning: there are a lot of steps here...not because anything is complicated. It's simply my way of hand holding you through to a great fitting bathing suit.
Draping the Pattern

2. Fold each in in half and cut a demi-circle.
3. Tape one piece to the doll's back.
4. Put the second piece over the doll's front and then pin to the back at each shoulder.
5. Stretch the fabric and pin under the crotch.
6. Working from side to side. Stretch both pieces and pin along each side of the doll.
7. Work from front to back and stretch so that the knit fits firmly and smoothly over the doll's body.
8. Clip away the excess.
9. Turn the doll over and continue to fit.

12. Again, trim away the excess.
13. For the basic bodysuit, feel along wear the leg joins the body.
14. You will make your line here. You can always come back later and recut this line if you desire a higher cut suit. Just be aware that the doll's mechanics may not make her attractive in a scantier cut around the legs and hips! This is especially the case with some Barbies who have imprinted panties on their bodies.
15. Begin marking your pattern along the line of pins. Trace along the sides.
16. Trace around the armholes and shoulders on the front and on the back!
17. Figure out where the center of the doll's body is and with a ruler, make a vertical line down her center front.
18. Do the same thing for the back. After everything is clearly marked, remove this from the doll and prepare to make a paper pattern.
Transferring to Paper Pattern

2. Fold along the center line and compare.
 3. More than likely, one shoulder is higher than the other. Find the mid point and raise one side higher and the other slightly lower. Repeat for the back
4. My front is wider than the back. We need to console the difference.
5. Lay the front over the back and note the difference in width. Find the midpoint, then make the front more narrow.
6. My back will be wider. When you are finished. the front and back should be the same width.
7. My shoulder line in the front is wider than the back. I note the difference between the two, mark the midpoint.
8. With the front over the back, look at the bathing suit crotch and make adjustments so that this area lines up by raising and lowering to two lines.
9. In the front, move the shoulder line over a bit to straighten it up.
10. Repeat on the back. What you are doing is to compensate for each move so that the measurements are faithful to the original pattern but line up better.
Flip the back upside down and join it to the front at the crotch line. Then add seam allowance. For the standard suit, you may want to add seam allowance all over and turn down the edges. Note: if you do this, it will be easier if you finish your edges before sewing. But keeping with the spirit of this project, I'll only add seams at the sides and shoulders. I should also note that the suit on the left is fuller and was created to cover my Barbie SIS panty area. The suit on the left is high cut and works well with the look of my Barbie Model Muses.


2. I wanted a V-neck effect, so I used a straight edge to help guide me as I cut.
3. Slash, making slats 3/8-1/4" (5-6mm) deep. For this suit, I did this on both sides
4. Place on the doll. Here's what she looks like in the front.
5. Here's the back.
6. Tug carefully and roll in your fingers to loosen and create somewhat of a roll.
7. It should look something like this.

8. Pull the second slat up and over the first. Then give a single twist.
9. Feed the third slat through this loop. Pull up and give a single twist to create a new loop.
10. Feed the four slat through this loop, etc. until you have reached the end. Stitch the tip to the garment.

11. The back is already cut into slats.
12. Pull the second slat up and over the first.
13. Pull down past the third slat.
14. Thread the third slat up and over the second.
15. Repeat until you are finished.

16. Pull the suit away from the doll and make diagonal slashes over the abdomen.
17. Slash the shoulders, cutting down to the top of the bust.
Pull one strap over the shoulder.

My end results are not as "clean" as I'd like it to be. (The one fabric I didn't have a chance to explore is Lycra to see if it cuts and stretches better.) The problem is course, the scale and what happens when you slash fabric for a small doll. Still, I'm pretty happy with the results (and so are the dolls!) They didn't get their pool, but many did get swimwear!


All images and text property of Fashion Doll Stylist. Copyright 2016. Please do not reproduce without requesting permission first. Thank you.

Follow us on Twitter: @FashDollStylist
Like us on Facebook: www.facebook.com/FashDollStylist
We're also on Pinterest: www.pinterest.com/FashDollStylist
Come show us your stuff on Instagram: www.instagram.com/fashiondollstylist


Nhận xét
Đăng nhận xét