Angel Food

For all of the looks here, I used a cotton voile and some very simple patterns.

The first dress begins with a classic 2-piece dress. The top is a strapless fitted bodice with a flared (or 4-gore) skirt attached.

1. Sew the dress and finish it.
2. You can use ribbon or make your own straps out of small scraps of the same cotton Folded, glued and pressed in place. I've pinned the straps to the dress then stitched them down. In this case, the straps are only attached to the front and tie behind the doll's head in the back.
3. Cut a diagonal strip of fabric that is twice the circumference of the doll and about 2" (5cm) long. Hem the edges.

5. You can stop there or... Make little sleeves. Cut a width of the strip. Hem both top and bottom, then make a tube by stitching the side edges together.
6. Make a running stitch at the top, pull the thread to gather. Carefully stitch down the gathers.
7. Sew the seam of the sleeve to the side of the dress bodice.

The one is a peasant dress that, in a shorter length, you can also make as a blouse and to wear over jeans, if dolly wants a more casual look.

1. Begin by cutting a length of fabric which is as long as you would like the dress. The width should be 2-4 times the circumference of the doll, depending on how full you want the dress. Pictured here, I made m dress 4x the doll's width.
2. For the sleeve, I cut two more rectangles that are half the size of the body of the dress. Altogether you have 3 rectangles which you should hem top and bottom. Fold in half and stitch each one down the one unique side.
3. Gather the tops of each segment. Adjust the body of the dress on the doll, then stitch the gathers down. The sleeve segments should be gathered at the top and the bottom.

4. You can then either stitch the sleeves to the body of the dress at the underarms or treat them as detachable elements which gives dolly two looks for the price of one!

Another very pretty look, inspired by the peasant wear we're seeing in Paris. This is a simple tent dress trimmed with a ruffle at the hem.
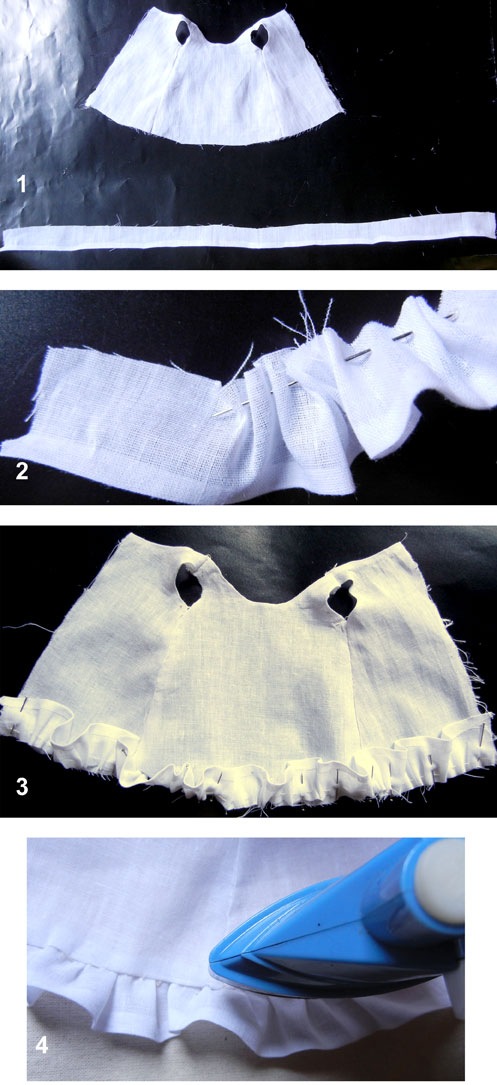
2. Next, take a strip of cotton which is at least twice the width of the dress's hem (or more if you want the ruffles to stand out more). Gather the top of this strip.
3. Pin to the dress, raw side to raw side. The ruffles will be pinned upside down on the dress. Adjust so that they are even. Then stitch down.
4. Finish the back seam. Then iron, near the seam at the hemline, (just above but not on the ruffles).

Finally is the "Angel Blouse" worn over jeans. It is a shorter version of the dress I just made but with a longer ruffle. Use the pattern for the tent dress but cut it down to a shorter length and leave the back open, closing it with a single snap or hook and eye. My ruffle here is twice the width of the blouse's hem and 1 3/4 inch (4.5cm) long.

All images and text property of Fashion Doll Stylist. 2016. Please do not reproduce without prior permission.
Follow us on Twitter: @FashDollStylist
Like us on Facebook: www.facebook.com/FashDollStylsit
We're also on Pinterest: www.pinterest.com/FashDollStylist
Show us your stuff on Instagram: www.instagram.com/fashiondollstylist
- Posted using BlogPress from my iPhone


Nhận xét
Đăng nhận xét